The holiday season is a time for joy, togetherness, and, of course, decorating. Among the myriad of festive adornments, clear craft Christmas ornaments offer a unique canvas for creativity. Their transparency allows for a dazzling array of personalization options, transforming a simple bauble into a cherished keepsake. Whether you’re a seasoned crafter or a beginner looking to add a personal touch to your holiday décor, this guide will equip you with the knowledge and inspiration to create stunning, one-of-a-kind clear ornaments.
Why Choose Clear Craft Ornaments? The Blank Canvas Advantage

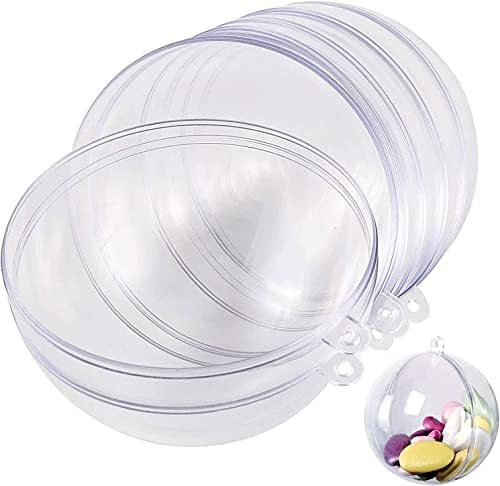
Clear craft ornaments, often made from acrylic or glass, provide an unparalleled opportunity for personalization. Unlike opaque ornaments that require surface decoration, clear ornaments invite creativity from within. This inherent translucency offers several advantages:
- Versatility: They serve as a base for a multitude of filling and decorating techniques.
- Elegance: The clarity itself adds a sophisticated and delicate touch to any Christmas tree.
- Memory Keeping: They are perfect for capturing memories, from baby’s first Christmas to special travel adventures.
- Gift Potential: Personalized ornaments make thoughtful and unique gifts for loved ones.
According to a 2022 survey by the National Retail Federation, holiday spending on decorations reached an estimated $6.8 billion in the US, highlighting the significant consumer interest in festive embellishments. Personalized ornaments, in particular, tap into the growing trend of consumers seeking unique and meaningful items over mass-produced goods.
Unleashing Your Inner Artist: Popular Personalization Techniques
The beauty of clear ornaments lies in the diverse range of techniques you can employ to make them your own. Let’s explore some of the most popular and impactful methods:
1. The Art of Filling: A World of Treasures Inside
This is arguably the most straightforward yet impactful way to personalize clear ornaments. The hollow interior becomes a miniature display case for your chosen fillings. The key is to select items that are small enough to fit through the ornament’s opening and that complement your desired aesthetic.
Filling Ideas to Spark Your Imagination:
- Glitter and Confetti: The classic choice! Layer different colors and sizes of glitter for depth and sparkle. Metallic confetti adds a festive shimmer.
- Faux Snow and Miniatures: Create a winter wonderland scene with artificial snow, tiny pinecones, miniature trees, or even small figurines like reindeer or snowmen.
- Natural Elements: Dried flowers, small twigs, faux berries, or even tiny seashells can evoke a natural or coastal holiday feel.
- Fabric Scraps and Ribbons: Small pieces of festive fabric, pom-poms, or colorful ribbons can add texture and visual interest.
- Photographs: Roll up a small, favorite photograph to create a truly sentimental ornament. This is perfect for commemorating family events or loved ones.
- Candy and Sweets: Tiny candies, sprinkles, or even small, wrapped chocolates can make for a sweet and edible (though perhaps not to be eaten after being on a tree!) decoration.
- Embellishments: Small beads, sequins, charms, or even miniature Christmas-themed items like tiny bells or stars.
Example: For a “Winter Wonderland” ornament, you might fill a clear sphere with faux snow, a few tiny evergreen sprigs, and a miniature wooden reindeer. For a more whimsical approach, consider filling another with rainbow-colored glitter and small, star-shaped confetti.
2. Paint and Permanent Markers: Bringing the Outside to Life

While filling offers internal beauty, decorating the exterior of the ornament provides another layer of personalization. Permanent markers and specialized craft paints are your allies here.
Exterior Decoration Techniques:
- Hand-Painted Designs: Use fine-tip permanent markers or acrylic paints to draw intricate patterns, festive scenes, or simple polka dots.
- Stenciling: Utilize pre-made stencils or create your own to apply consistent designs like snowflakes, stars, or holiday greetings.
- Calligraphy and Lettering: Write names, dates, or meaningful quotes in elegant script. This is particularly popular for commemorating milestones.
- Marbling Effect: A technique involving dropping different colored paints into a water-filled container and swirling the ornament through it to create a marbled effect on the inside.
- Frosting Effect: Use frosted glass spray paint or a specialized frosting medium to give your ornament a subtle, ethereal glow.
Case Study: Sarah, a kindergarten teacher, creates personalized ornaments for her students each year. She uses permanent markers to write each child’s name and a small drawing of their favorite animal on clear ornaments. This simple yet thoughtful gesture is treasured by both students and parents.
Tip: For a smoother painting experience, you can lightly sand the exterior of glass ornaments to create a better surface for paint adhesion. Always test your markers or paints on a small, inconspicuous area first.
3. Decoupage: Layering Papers for Richness

Decoupage involves adhering thin pieces of paper or fabric to a surface and sealing them with a special glue or medium. This technique allows for the use of beautiful patterned papers, photos, or even tissue paper for a delicate effect.
Decoupage Ideas for Ornaments:
- Christmas Scrapbook Paper: Cut out festive motifs, snowflakes, or winter scenes from scrapbook paper.
- Tissue Paper: Crinkle and adhere layers of colorful tissue paper for a soft, translucent look.
- Printed Photos: Print photos on thin paper and decoupage them onto the ornament for a truly personal touch.
- Book Pages or Sheet Music: Vintage book pages or old sheet music can add a unique, antique charm.
Statistic: The global decoupage adhesive market is projected to grow significantly in the coming years, driven by the increasing popularity of DIY crafts and personalized home décor.
Process: Apply a thin layer of decoupage medium to a section of the ornament, carefully place your paper element, and then apply another layer of medium over the top to seal and adhere it. Repeat until the desired coverage is achieved.
4. Vinyl Decals and Lettering: Precision and Polish
For a clean, professional look, consider using a cutting machine like a Cricut or Silhouette to create custom vinyl decals and lettering.
Vinyl Personalization Applications:
- Names and Dates: Add names of family members, wedding dates, or birth years.
- Holiday Sayings: “Merry Christmas,” “Happy Holidays,” or custom short phrases.
- Monograms: Elegant initials can add a sophisticated touch.
- Simple Graphics: Small snowflakes, stars, or silhouette images.
Tip: Ensure your vinyl is designed for permanent adhesion and that the surface of your ornament is clean and dry before applying. For curved surfaces like ornaments, heat can sometimes help the vinyl conform better.
5. Glitter Dusting: Subtle Sparkle

If you prefer a more subtle shimmer than chunky glitter, consider a glitter dusting technique. This involves applying a thin layer of adhesive and then gently dusting it with ultra-fine glitter.
Glitter Dusting Methods:
- Spray Adhesive: Lightly spray the ornament with a clear adhesive spray and then roll it in ultra-fine glitter.
- Glue Stick and Glitter: Apply a thin layer of glue stick to the desired areas and sprinkle with glitter.
- Glitter Glue: Use glitter glue pens or bottles for more controlled application of fine glitter.
Example: A delicate dusting of silver glitter around the top of a clear ornament can add a touch of winter frost without being overwhelming.
Choosing the Right Clear Ornament Type
Not all clear craft ornaments are created equal. Understanding the different types will help you select the best option for your intended personalization technique:
- Acrylic Ornaments: These are generally lightweight, shatterproof, and budget-friendly. They are excellent for filling, painting, and vinyl applications. Their slightly softer surface can be more forgiving for beginners.
- Glass Ornaments: These offer a more premium feel and a higher-quality sheen. They are ideal for delicate hand-painting and can achieve a very sophisticated look. However, they are more fragile and require careful handling.
- Shape Variations: Beyond spheres, you’ll find clear ornaments in various shapes like teardrops, stars, diamonds, and even novelty shapes, each offering a unique canvas for your creativity.
Tips for a Flawless Finish
To elevate your personalized ornaments from good to great, keep these tips in mind:
- Cleanliness is Key: Always start with a clean, dry ornament. Wipe down glass and acrylic surfaces with a lint-free cloth and rubbing alcohol to remove any fingerprints or dust.
- Patience is a Virtue: Allow ample drying time between layers of paint, glue, or sealant. Rushing the process can lead to smudges and a less professional finish.
- Use the Right Tools: Invest in good quality brushes, fine-tip markers, and appropriate adhesives for the best results.
- Work in Layers: For complex designs, building up your elements in layers will often yield a more dynamic and visually appealing outcome.
- Seal Your Work: For painted or decoupaged ornaments, a clear sealant (like Mod Podge or a spray sealant) will protect your design and add a professional sheen.
- Consider the Ornament’s Opening: When filling, the size of the opening is crucial. Funnels are invaluable tools for precise filling.
- Practice Makes Perfect: Don’t be afraid to experiment! Your first few ornaments might not be perfect, but with practice, you’ll develop your own techniques and style.
Beyond the Tree: Creative Uses for Personalized Ornaments
While the Christmas tree is their primary home, personalized clear ornaments have other charming uses:
- Gift Toppers: Tie a personalized ornament to a gift box for an extra special touch.
- Place Settings: Use them as elegant place cards for your holiday dinner table.
- Party Favors: Hand out personalized ornaments as thank-you gifts to guests at holiday parties.
- Yearly Tradition: Create a new personalized ornament each year to represent significant events or memories.
Crafting Memories, One Ornament at a Time
Personalizing clear craft Christmas ornaments is more than just a crafting activity; it’s a way to inject your unique story and sentiment into the heart of your holiday celebrations. From the simple joy of filling them with cherished items to the meticulous art of hand-painting and embellishing, each ornament becomes a tangible representation of love, memory, and creativity. By understanding the diverse techniques, selecting the right materials, and embracing the spirit of experimentation, you can transform ordinary clear ornaments into extraordinary heirlooms that will be treasured for years to come. So, gather your supplies, unleash your imagination, and start crafting memories, one beautiful, personalized ornament at a time.